Not to be confused with evaporated milk, sweetened condensed milk is very sweet (and very sticky) and used primarily in desserts.
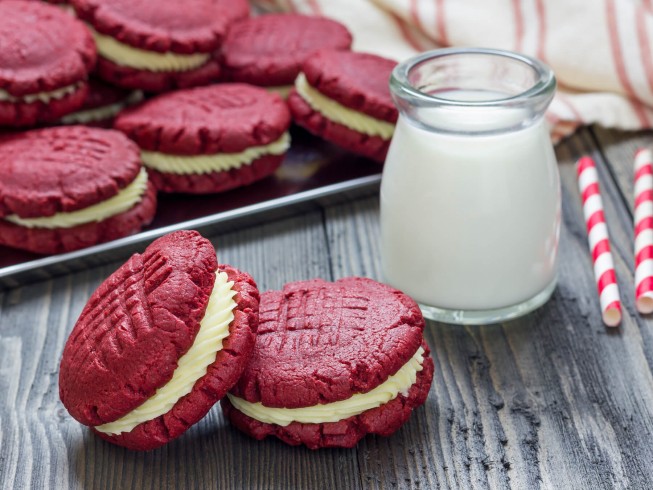
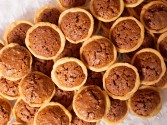
The trick to making red velvet cookies is laughably easy - just start with a red velvet cake mix. With beautiful fluffy outsides and a rich vanilla cream filling, these cookies are downright deluxe.

Cookies
1 package (18.25 ounce size) red velvet cake mix
2 eggs
1/3 cup oil
Filling
1/4 cup all-purpose flour
1 cup milk
1/2 teaspoon salt
1 cup butter
1 cup granulated sugar
2 teaspoons vanilla extract
Preheat the oven to 375 degrees F. Lightly grease a baking sheet.
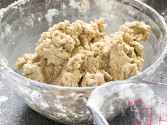
Combine the cake mix, eggs, and oil until well mixed and the batter is thick like cookie dough.
Roll the dough into rounded balls, about 1/2 teaspoon in size. Place on the prepared baking sheet and flatten down slightly with a flat bottomed glass. Use a fork to make criss cross marks on the tops if desired.
Place in the oven and bake at 375 degrees F for 8-10 minutes or until the tops of the cookies begin to crack slightly. Do not overbake.
Remove from the oven and let cool on the baking sheet for 1-2 minutes then remove to a cooling rack.
For the filling, combine the flour, milk, and salt in a saucepan over medium heat. Whisk until smooth and cook, stirring, until it forms a thick paste.
Remove from heat, cover, and let cool for 2 or more hours.
Combine the butter and sugar in a mixing bowl and mix on medium speed until fluffy. Add in the cooled flour mixture and vanilla and beat until smooth.
To assemble the cookies, spread filling on one of the cookie bottoms not quite to the edges. Sandwich it with another cookie. Repeat with remaining cookies.
Store the red velvet cake mix cookies in an airtight container.
Use room temperature eggs for best results.
Sift the cake mix before combining to make sure there are no lumps.
Try different flavored extracts in the filling such as almond for a different twist.
For a more intense red color, add a few drops of red food coloring to the dough.
Make sure the filling has fully cooled before spreading it.
Add mini chocolate chips or chopped nuts to the cookie dough for added texture.
If you want softer cookies, underbake them slightly and let them cool on the baking sheet.
Roll the cookie dough balls in powdered sugar before baking for a crinkly effect.
You can substitute another cake mix such as chocolate, vanilla, or even carrot cake to create different flavored cookies, but the iconic red color and flavor will be lost.
Any neutral-flavored oil works well, such as vegetable oil, canola oil, or light olive oil. Avoid using strong-tasting oils like extra virgin olive oil as they can alter the flavor of the cookies.
If your kitchen is warm or the dough feels overly soft, chilling the dough for about 30 minutes before baking can help prevent spreading. Be sure not to overmix the dough, as this can also lead to spreading.
You can prepare the cookie dough ahead of time and store it in the refrigerator for up to 2 days before baking. The filling can also be made a day in advance and stored in the refrigerator.
You can freeze the assembled cookies. Place them in airtight containers or freezer bags and separate layers with parchment paper to avoid sticking. They can be stored in the freezer for up to 3 months.
If your filling is too runny, you can cook it a bit longer in the saucepan, stirring constantly, until it thickens more. Make sure to let it cool completely before using.
Store leftover cookies in an airtight container at room temperature for up to 3 days.
The cookies should be slightly puffy and the tops will have started to crack but should not be darkened or too hard. They will continue to set as they cool.
You can use other fillings such as cream cheese frosting, Nutella, or even a simple buttercream.
You can drizzle melted white or dark chocolate over the cookies, sprinkle with powdered sugar, or add sprinkles to them after assembling.
Mixing Bowl(s): A large bowl for combining the ingredients like red velvet cake mix, eggs, and oil to create the cookie dough. Another mixing bowl is needed to beat together the butter and sugar with an electric mixer.
Measuring Cups and Spoons: For measuring the oil, flour, milk, sugar, and other ingredients required for both the cookies and the filling.
Baking Sheet: For placing the rolled cookie dough balls during baking. It should be lightly greased to prevent sticking.
Flat-Bottomed Glass: To flatten the dough balls slightly before baking.
Fork: For creating crisscross marks on the tops of the cookies, adding a decorative touch (if desired).
Cooling Rack: Important for allowing the cookies to cool after baking.
Saucepan: For cooking the filling mixture on the stove.
Whisk: Used in the saucepan for mixing the filling ingredients until smooth and thickened.
Electric Mixer: For beating the butter and sugar together until fluffy, as well as for mixing in the cooled filling and vanilla extract.
Spatula: Helpful for spreading the filling onto the cookies and assembling the sandwich cookies.
Milkshakes: Serve these cookies alongside a vanilla or chocolate milkshake. The creamy, cold texture of the shake can balance the soft, rich cookie.
Ice Cream Sandwich: Transform these cookies into ice cream sandwiches by adding your favorite flavor of ice cream in place of the cream filling.
Chocolate Drizzle: A drizzle of melted dark chocolate over the assembled cookies will turn them into a more lavish treat.
Coffee: Pair these cookies with a hot cup of coffee. The bitterness of the coffee will cut through the sweet filling.
Tea: Enjoy with a strong black tea, like Earl Grey or English Breakfast. The robust flavors of the tea will balance the sweetness of the cookies.


Not to be confused with evaporated milk, sweetened condensed milk is very sweet (and very sticky) and used primarily in desserts.

A can of cream of mushroom soup can be a real dinner saver. It works great in casseroles and can turn into a sauce or gravy in a pinch.

Pizza night is always a favorite, especially when you have great tasting pizza from some of the most popular restaurants.
reviews & comments
April 23, 2014
This southern gal thought these were fantastic! Looked pretty too.
March 26, 2014
Mine weren't done in 10 minutes but that was the only thing that wasn't correct. Took 12-14 minutes.
February 26, 2014
Turned out delicious! Not sure why the other person didn't like them. Maybe you used a cheap brand of cake mix? They tasted just like red velvet cake to me! LOVED them!
February 27, 2009
I bought some red velvet cookies at the store and thought that they were great. So I looked on line for a recipe. When I made them they looked great but they tasted nothing like red velvet. They didnt really have a taste and the frosting didnt help. I usually bake from scratch and I have never made red velvet cake from a box. Im guessing that the cake isnt really good either.