A 4th of July Fried Chicken Tradition

Friend or Foe
It is no easy task to ask an increasingly health-conscience country to eat something like fried chicken, what many consider to be the quintessential fatty food. ĀThis classic American dish always has a coating of one kind or another on the chicken, whether skinless or not. ĀBut fried chicken need Ānot be cooked in a cauldron of hot grease; it can be "oven fried," or baked. ĀSince the USA's birthday falls on the 4th, I list below four different recipes for your picnic basket. ĀFried chicken can be made on the bone, off the bone, with or without skin, or even in strips as a topper to a salad.
To Fry or to Bake
The decision to fry or to bake is really an easy one. ĀDo you want to use the skin? ĀIf so, then you must fry. ĀFried chicken with skin works best when the skin can render its fat, and cooking it in the oven with a coating does not really allow that to happen. ĀIf you want to go skinless, then you have the option to bake or fry, irrespective of the coating you choose. ĀIf you are not sure what kind of coating you want the chicken to have, but you are certain you want to watch your fat intake, then baking is the best option.
Temperature and Equipment
Baking requires a lot less attention than frying. ĀYou set the temperature, wait until the oven is warm, and place the food in the oven for a set period of time. ĀBut frying requires hands-on concentration with a lot of potential temperature fluctuation that any cook needs to monitor. Ā
To fry chicken, the fat should be between 325-375 degrees F depending on the fat and fry method you use. ĀWhen you put larger pieces of chicken in the pot, the temperature will drop more significantly than when you put in smaller pieces, such as wings. ĀIt is important to fry like-sized pieces Ātogether to facilitate even cooking time, which makes your job a lot easier. Ā
As always when frying, do not overcrowd the pot. ĀWork in batches. ĀIf you crowd the pan, the temperature will drop too quickly and the chicken will absorb more of the oil than necessary. ĀA deep fryer, aptly named, is ideal for the undertaking. ĀHowever, a deep cast iron skillet or Dutch oven is equal to the task. ĀDo not fill the pot more than half way, as the fat will rise when the chicken is added.
Packing the Picnic
Fried chicken is such a terrific picnic food because it travels well at room temperature. ĀOnce you have finished frying all your chicken and have drained it on paper towels, place the chicken in a large paper bag. ĀThis allows the chicken to breathe a little while it continues to release some residual heat, all while absorbing any excess grease. ĀPlus, a paper bag makes for easy cleanup when the picnic ends. ĀAll you have to do is throw out the bag : no extra reusable containers to lug home! Ā
Oven-fried chicken is not very greasy, so it can be stored in any type of travel container. ĀJust be sure to let it cool first before packing so that it does not "sweat," making itself soggy en route to your outdoor meal. ĀKeep your salads cold and crisp with ice packs or thermal packaging.
One more important tip when having a picnic: HAVE FUN! ĀHappy Birthday, USA!
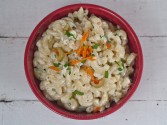

Made with vegetable oil, sour cream, lemon juice, buttermilk, sugar, salt, black pepper, onion, carrot, green bell pepper
Serves/Makes: 6
- 1 pound macaroni pasta
- 1 tablespoon vegetable oil
- 1/4 cup sour cream
- 2 tablespoons lemon juice
- 2 tablespoons buttermilk
- 1 teaspoon sugar
- 1 teaspoon salt
- 1/2 teaspoon ground black pepper
- 1/4 cup onion, finely chopped
- 1 medium carrot, finely diced
- 1/2 green bell pepper, finely diced
- 1 medium celery stalk, finely diced
- 2 tablespoons chopped parsley
- 8 pimento-stuffed green olives, finely chopped (optional)
Cook the macaroni, rinse and drain. Toss with vegetable oil. Set aside.
In a large bowl, mix the sour cream, lemon juice, sugar, salt, pepper and onion. Add the macaroni and toss to coat. Add the carrot, bell pepper, celery, parsley and optional olives.
Refrigerate until ready to serve.
This recipe is best made at least one hour up to one day in advance of serving so that the flavors have time to develop.
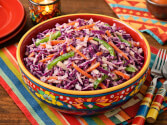
Made with mayonnaise, sour cream, sugar, lemon juice or vinegar, celery seed, salt and pepper, red cabbage, carrot, green pepper
Serves/Makes: 4
- 1/2 cup mayonnaise
- 1/4 cup sour cream
- 2 teaspoons sugar
- 2 teaspoons lemon juice or vinegar
- 1/2 teaspoon celery seed
- salt and pepper, to taste
- 1/2 medium head red cabbage, finely shredded
- 1 small carrot, shredded
- 1 small green pepper, julienne
In a large bowl, mix the first six ingredients.
In a separate bowl toss the shredded cabbage, carrot and green pepper. Stir in the dressing until well coated.
Refrigerate until ready to serve.
If you want to eliminate mayonnaise, simply combine 1 part vegetable oil to two parts vinegar and two parts sugar. This will make a sweet and sour, non-creamy coleslaw.
Recipe Source: CDKitchen columnist Lauren Costello
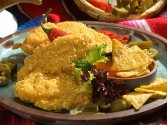
Made with chicken breast halves, flour, salt, black pepper, Dijon mustard, milk, cornflake crumbs, Parmesan cheese
Serves/Makes: 4
- 1/2 cup flour
- 1 teaspoon salt
- 1/2 teaspoon ground black pepper
- 2 teaspoons Dijon mustard
- 1/2 cup whole or 2% milk
- 1 cup cornflake crumbs
- 3 tablespoons grated Parmesan cheese
- 4 skinless bone-in chicken breast halves
Preheat the oven to 400 degrees F. Grease a rimmed baking sheet.
Place the flour in a shallow dish and add half the salt and pepper to the flour. Mix well.
In another shallow dish, whisk together the mustard and milk. In a third shallow dish, combine the cornflake crumbs, Parmesan cheese, and remaining salt and pepper.
First dredge the chicken pieces in the flour mixture, shaking off any excess. Then dip the chicken into the milk mixture, coating on all sides and letting excess liquid drip off. Finally, dredge the chicken in the cornflakes, pressing lightly so the crumbs adhere to the chicken. Place the chicken on the baking sheet.
Place the baking sheet in the oven and bake at 400 degrees F for 45 minutes or until the chicken is cooked through and the coating is lightly browned.
Serve hot or at room temperature.
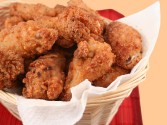
Made with vegetable oil or shortening, black pepper, chicken, buttermilk, all-purpose flour, salt, onion powder, paprika, cayenne pepper
Serves/Makes: 4
- 3 pounds chicken, rinsed and patted dry, cut into 8 pieces
- 1 quart buttermilk
- 1 cup all-purpose flour
- 1 teaspoon salt
- 1 teaspoon onion powder
- 1 teaspoon paprika
- 1/2 teaspoon cayenne pepper
- 1/2 teaspoon black pepper
- vegetable oil or shortening for frying
Combine chicken and buttermilk in a large bowl and refrigerate for 8 hours or overnight.
In a large plastic bag, mix the flour, salt, onion powder paprika, cayenne pepper, and black pepper. Shake well to combine. Remove one piece of chicken from the buttermilk and shake off any excess liquid.
Put the chicken in the bag one piece at a time and shake well to coat. Place chicken on a sheet pan or wax paper and let it rest for 20-30 minutes.
Meanwhile, heat the fat over medium-high heat in a heavy, deep pan, such as a cast iron skillet or Dutch oven. The fat should reach about 325 degrees F if using shortening and about 350 degrees F if using oil.
Depending on the depth and width of your vessel, fry one third to one half of the chicken pieces, using like-sized pieces per batch, skin-side down. Watch the temperature and adjust heat accordingly. Fry until the chicken is golden brown and the juices run clear when the meat is pierced with a knife, about 20-25 minutes for dark meat and 15-20 minutes for white meat. Turn the chicken half way through the cooking process to ensure even color.
Drain the chicken on paper towels.
Keep warm in a 225 degrees F oven as you work in batches if you plan to serve immediately. Remove the skin for a lighter version of this recipe.


related articles


1 comments
Wow what a great article - Lauren you really write well - your directions are so clear and you epxlain why and how things happen and why and how to do them. I think I just became your biggest fan!
Comment posted by Maddie
Write a comment:
©2026 CDKitchen, Inc. No reproduction or distribution of any portion of this article is allowed without express permission from CDKitchen, Inc.
To share this article with others, you may link to this page:
https://www.cdkitchen.com/cooking-experts/lauren-braun-costello/116-fried-chicken/