cdkitchen > cooking experts > rebecca michaels

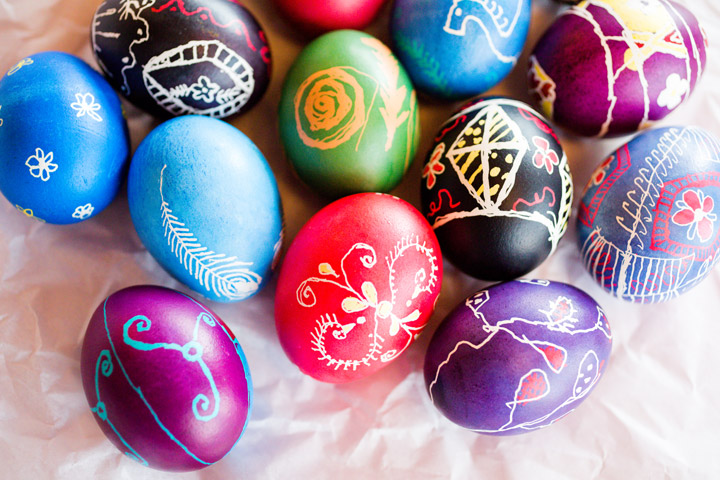
In my family, a long-standing Lenten institution is to decorate our eggs in the Lithuanian tradition. The practice of making these boldly colored and intricately designed works of art were a rich addition to our Easter Sunday table and added color and pizzazz to our spread.
The practice of decorating eggs dates as far back as the 4th Century in what is now Germany. By the 13th Century presenting eggs at Church to be blessed was practiced in Eastern Europe, including Lithuania, the Ukraine, and Hungary. Eggs symbolize life for many, and were thought to have mystical powers that afforded them good fortune and protection.
The eastern European dying method creates extremely vibrant, multi-colored eggs worthy of keeping, some of which we did. Traditionally, rich dyes were made from natural products such as onionskin and oak bark, which were boiled to release their hues. Vinegar was added to make the colors stronger. Today the dyes include chemicals to enhance and preserve color.
The basic technique involves creating designs by drawing on the egg in beeswax to preserve the color underneath. Using the head of a pin pushed into the eraser on a pencil, geometric designs are patterned out and then dyed again. The eggs are dyed from lightest to darkest to retain the underlying colors. For example, first you draw a beeswax design on the boiled egg, and then you dip the egg in pale blue dye. After you remove it, you will see that the pattern you created in white stayed white. After the egg dries, repeat the procedure, this time drawing on the pale blue. Dip and let dry.
When you are satisfied, carefully melt the wax off of the egg with a candle and then shine it up with a light coat of vegetable oil. Obviously you can get extremely intricate designs. Some artisan eggs can take hours to finish. You have before you an infinite combination of colors and patterns that can end only with your own imagination.
If you decide to try this at home, I recommend an instruction book and the appropriate dye from an Eastern European culture store or bakery. This will not work with Paas or food coloring. Remember that some dyes are edible and others only decorative. Make sure you ask before you buy.
It is a tedious process that requires lots of practice, but at the end of the day you will have beautiful eggs that will light up any Easter celebration. While they may not be ready for auction at Sotheby's, they will certainly be your own family treasure.
I'll leave you with a great tradition. Two people knock the wide ends of their Easter eggs together. Whomever's egg doesn't break is guaranteed happiness and good fortune throughout the coming year.
Su ventom Velykom!
©2026 CDKitchen, Inc. No reproduction or distribution of any portion of this article is allowed without express permission from CDKitchen, Inc.
To share this article with others, you may link to this page:
https://www.cdkitchen.com/cooking-experts/rebecca-michaels/247-decorating-easter-eggs/
Old School Easter Eggs


In my family, a long-standing Lenten institution is to decorate our eggs in the Lithuanian tradition. The practice of making these boldly colored and intricately designed works of art were a rich addition to our Easter Sunday table and added color and pizzazz to our spread.
The practice of decorating eggs dates as far back as the 4th Century in what is now Germany. By the 13th Century presenting eggs at Church to be blessed was practiced in Eastern Europe, including Lithuania, the Ukraine, and Hungary. Eggs symbolize life for many, and were thought to have mystical powers that afforded them good fortune and protection.
The eastern European dying method creates extremely vibrant, multi-colored eggs worthy of keeping, some of which we did. Traditionally, rich dyes were made from natural products such as onionskin and oak bark, which were boiled to release their hues. Vinegar was added to make the colors stronger. Today the dyes include chemicals to enhance and preserve color.
The basic technique involves creating designs by drawing on the egg in beeswax to preserve the color underneath. Using the head of a pin pushed into the eraser on a pencil, geometric designs are patterned out and then dyed again. The eggs are dyed from lightest to darkest to retain the underlying colors. For example, first you draw a beeswax design on the boiled egg, and then you dip the egg in pale blue dye. After you remove it, you will see that the pattern you created in white stayed white. After the egg dries, repeat the procedure, this time drawing on the pale blue. Dip and let dry.
When you are satisfied, carefully melt the wax off of the egg with a candle and then shine it up with a light coat of vegetable oil. Obviously you can get extremely intricate designs. Some artisan eggs can take hours to finish. You have before you an infinite combination of colors and patterns that can end only with your own imagination.
If you decide to try this at home, I recommend an instruction book and the appropriate dye from an Eastern European culture store or bakery. This will not work with Paas or food coloring. Remember that some dyes are edible and others only decorative. Make sure you ask before you buy.
It is a tedious process that requires lots of practice, but at the end of the day you will have beautiful eggs that will light up any Easter celebration. While they may not be ready for auction at Sotheby's, they will certainly be your own family treasure.
I'll leave you with a great tradition. Two people knock the wide ends of their Easter eggs together. Whomever's egg doesn't break is guaranteed happiness and good fortune throughout the coming year.
Su ventom Velykom!
share this article:


related articles


Write a comment:
©2026 CDKitchen, Inc. No reproduction or distribution of any portion of this article is allowed without express permission from CDKitchen, Inc.
To share this article with others, you may link to this page:
https://www.cdkitchen.com/cooking-experts/rebecca-michaels/247-decorating-easter-eggs/